Well done, Dad! Foiled Let’s BBQ Father’s Day Card

My dad sure hit the jackpot creating me! He’s so lucky…

… but so am I to have a dad like him!

Today I have another video tutorial for you! This card was so fun and QUICK to create… I think it only took me 35 minutes!

FullSizeRender (4)

Please enjoy the video and don’t forget to give it a thumbs up or subscribe if you haven’t already!

Here is my close up of that glossy accents. It adds so much detail and dimension to your cards!

FullSizeRender (5)

I really hope you enjoyed this card and I hope everyone has a wonderful Father’s Day!

Tank You for Tuning in During Inspiration Week!

Summer 15 Inspiration WeekTank You Card

I cannot believe that the release is just a few hours away! Guess who will be working extra hard tomorrow…  and it’s my sister’s birthday – so it is going to be a VERY busy day!

This set called Fintastic Friends is literally “fintastic”! You can make a card for any occasion with these cute fishes! I just love adding a bit of Stickles in “disco ball” to this card to make it extra special and sparkly!

Fintastic Friends Dies Fintastic Friends

Do you love ink as much as I do?! Lawn Fawn also announced FIVE new colors today on the Lawn Fawn Blog! These colors are so Summer-y I can’t even handle it, and the formula is ON POINT!

Celery Stick Ink Pad Fish Tank Ink Pad Juice Box Ink Pad Lobster Ink Pad Peacock Ink Pad

You would be crazy to not head over to the Lawn Fawn Blog today to see what special prizes they are giving away! Keep tuning in for the reveal of the entire release tomorrow!!!!

Look What the Milk Man Brought Today!

Summer 15 Inspiration Week

Welcome to the next day of Inspiration Week over on the Lawn Fawn Blog! Today we are showcasing two of our new stand-alone dies that will change your die-cutting life!!

The Milk Carton Die is perfect for party favors, treats, or even as storage for beads and sequins! It is also amazingly easy to put together, just like our Goodie Bag Die!

Have a Ball Milk Carton

Here I used another new set from the release to make a cute treat box full of gumballs! How cute is the sneak of this stamp set?! A lot of people requested a set like this so I cannot wait to show you the whole thing!

Milk Carton Die

I do have a card using the Stitched Border Dies that are also being showcased today, but I am saving it for Monday’s post when the stamp set is revealed 😉

I hope you enjoyed this little treat box and I hope everyone checks out the Lawn Fawn Shop on the 4th to get their hands on it. I promise you will get SO MUCH use out of it!

Are You a Party Animal?

Summer 15 Inspiration Week

Today on the Lawn Fawn Blog, we are revealing the brand new Party Animals Stamp and Die sets that will be released next week!

This set is so fun and cute! It is not only great for birthday cards, but the critters go along with so many other Lawn Fawn sets!

Party Animal Card

For this first card, I wanted to really showcase the set! There are so many images in this set, I would challenge anyone to use all the images on one card!

I used a coloring technique I learned from Jennifer McGuire that adds so much texture to any image. I got a little obsessed and dotted all the COPIC coloring on this card. Even the grass got some dottin’!

Congrats Party Animal Card

Okay, so I just could not stop with the dot coloring! I made this card for a young friend graduating from 8th grade soon! I love how the critters from the Party Animals Stamp Set go so perfectly with any of the hats from the Hats Off to You Set.

This card also gives you a look at one of our new stand-alone word dies! The Lawn Fawn handwritten sentiments in the stamps and dies are so great because they can be playful and girly while working on masculine cards just as well!

Party AnimalParty Animal Dies

I want to point out that our card camera has been having some issues, so I’m sorry ahead of time if the picture quality of my cards is not 100% this week!

I hope you love this new set, and I cannot wait to see what you create with it when you get your hands on it next week!

Thank you so much for checking in with me, and make sure you check out the Lawn Fawn Blog for fun inspiration and giveaways all week!

Get Ready For Summer Inspiration!

Summer 15 Inspiration Week

It is Day 1 of Inspiration Week over on the Lawn Fawn Blog!

Sneak Peak 1 Sneak Peak 2 Sneak Peak 3 Sneak Peak 4 Sneak Peak 5   Did you enjoy all of the sneaks?

I am just so excited to share all of the projects I’ve made as well as let you see what all of the Design Team and Fawnies alike have created!

Make sure you check out the Lawn Fawn Blog daily for all the fun and plenty of giveaways!

Monochromatic Egg Patch Easter Card

Happy Easter!

IMG_3494

I hope everyone enjoys this special day filled with family and fun! 

Click the picture below to watch the video!

Thank you so much for tuning in!

Supplies:

Have an Otterly Great 5th Birthday, Lawn Fawn!

Hi everyone!

happy-5th-bday-lf

I am so excited to be part of this special blog hop celebrating Lawn Fawn’s 5th birthday!

IMG_3449

I made a similar card when I first got my hands on this Year 5 Stamp Set and it has been used a lot in advertising this release, so I thought this would be the perfect time to show how that card was made.


Thank you so much for tuning in! Have a great day and enjoy the hop!!

Next stop is Samantha!

Here is the complete blog list in case you want to start at the beginning!
Jenn Rachel Audrey Samantha Lenny Veronica Nancy Lorraine Caryn Sharna Suzanne Roxanne Lynn Laura Cheiron Ivy Karin Tamara Jana Lexa Debby me <– YOU ARE HERE
Samantha Yukari Christy Elise Amy Kathy

Supplies:

Happy Easter Card using Lawn Fawn inks and Eggstra Special Easter Set

I’m back!

I also have exciting news. I’m really trying to educate myself on creating quality tutorial videos!

Check out my first one here:

If you liked it, subscribe to my channel!

Thank you so much for checking in!

Supplies:

Clear Card Made Easy Using Xyron Products

photo

I’m so excited to share my first clear card!

I’ve been seeing so many crafters making these lately, and I really wanted to try it out and review it for myself.  I could not have chosen a better plan seeing how I got the opportunity to use some Xyron products that make these cards 99% easier!

photo 4

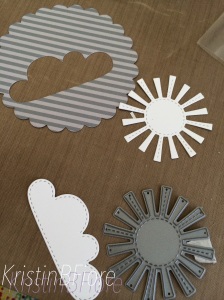
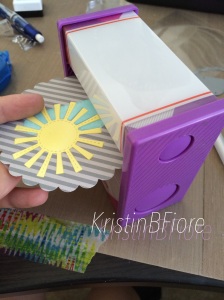
For the front of this card, I wanted to do some “die-cut inlaying.”  I took some pictures, so I will take you through it step-by-step in case you have never heard of this technique.  I first die cut a 3″ scalloped circle from Lawn Fawn’s Scalloped Circles Stackables for my background from a piece of Hippo Line Dance Paper out of my Let’s Polka 6×6 Petite Paper Pack. I also cut another scalloped circle from typing paper because I will need to have a base to adhere the pieced in die cuts to. I took the sun and largest cloud from the Spring Showers Lawn Cuts set and cut them out of some Neenah Solar White Cardstock.

photo 5

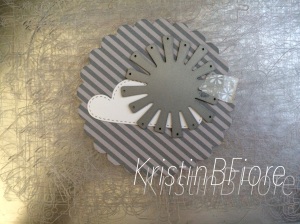
I wanted my sun to be in front of the cloud, so I die cut the cloud again out of my already cut scalloped circle, placed my white scalloped circle inside, and then cut the sun (see the picture above!). This will allow me to color all my white cloud pieces and my sun, add some Xyron Permanent Adhesive all over my typing paper circle, and then piece them back inside of the circle to create a flat, one-layer look. Like this…

photo 1

Great technique right? It’s extremely versatile as well, allowing you to get a lot more use out of all your  dies!

I used some Simon Says Stamp Inks. I’m absolutely in love with them, but they haven’t added the links to their newest inks yet, so you can find the Lemon Chiffon Ink HERE. The Audrey Blue Ink is a little older and I was able to link it below in the supplies.

photo 2

Now for the really cool part… when making a clear card, most crafters have to add extra die cuts on both sides of the front and both sides of the inside layer of the card so that adhesive wont be seen through the acetate. NOT ANYMORE! For this card I only needed to use one for the front and one on the inside because the Xyron 3″ Sticker Maker turned my die-cuts into stickers with a thin layer of adhesive that is completely unseen from the other side. You just push you die into the machine…

photo 3

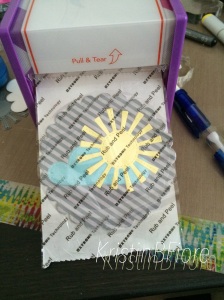
… and pull it out the other end. Use a bone bolder to firmly press on and all around the die cut to make sure the adhesive goes on evenly.

photo 3

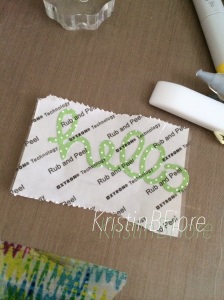
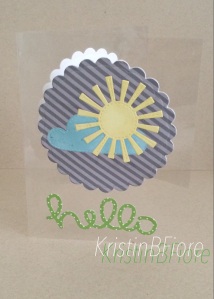
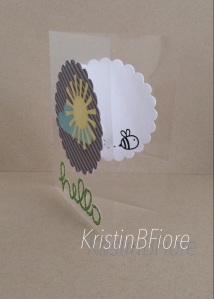
I did the same technique again for my Scripty Hello sentiment. I also cut another scalloped circle from some Neenah Solar White, stamped a cute little buzzing bee from the Hello Sunshine Stamp Set, and once attached to a Clear Hero Arts Notecard – you’re done.  Assembly was a total breeze!  You could add a sentiment instead on the inside, but I felt the ‘hello’ on the front of the card was enough.

photo 2

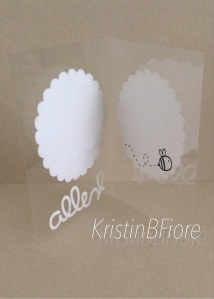
As you can see… NO ADHESIVE MARKS on the inside from the card-front!  Xyron is a total time saver!

Here’s the finished card again…

photo 1

Overall, here’s some tips for clear cards:

1.  You don’t want to see adhesive through the acetate – so if you don’t have a Xyron Sticker Maker, you’ll have to layer the back of the card-front and back of the inside with another die cut.

2.  Acetate gets dirty VERY easily and adhesive does not run off very cleanly all the time. Don’t take your acetate out until you’re ready to assemble your card. That way it stays clean, and there is no chance of something from your craft desk falling onto it and making a mess.

3.  Be creative! I have a feeling more and more people will be coming around to use these, so don’t be afraid to try something new on this futuristic type of card base.

Let me know if you have any questions, and have a great day!


SUPPLIES:

Birthday Card Using Fun Foam Die Cuts and New Lawn Fawn Products

I’m so happy to finally be settled in to my new home and ready to make some awesome posts to share with all of you!

Today I have a super simple card that is colorful and clean, yet has some great dimension. I used a BRAND NEW set from Lawn Fawn called “Beep Boop Birthday“… it is my favorite set from the new release. I love the cute robot images and the small gear images are really cool for creating personalized pattern papers that can give a complex look to any card that will make people really say “wow” even though it takes not much time and not much effort at all.

photo 1

To create this card I started with a standard sized Neenah Solar White card front. I then stamped the adorable square balloon stamp in multiple Simon Says Stamp Inks (individually listed down bellow in my supply list). I used some Memento Tuxedo Black Ink to stamp one of the robots and drew in the balloon strings with a 0.3 Copic Multiliner to make it look like the robot was holding the balloons. I used various Cool Gray Copic Sketch Markers to color the robot to give him a little dimension.

Now for the fun sentiment! I used Lawn Fawn’s Cole’s ABCs Lawn Cuts and die cut the word “birthday” from both the card front and a piece of kids adhesive fun foam that you could find at any local craft store. I used the memento ink again to stamp “beep boop” above the die cut area on the card front, trimmed the edges just a bit, attached the card front to a standard A2 Neenah Desert Storm card base, and pieced the foam letters into place. I did not need to use any extra adhesive because the foam sitting inset to the one layer of cardstock holds it like a perfect puzzle piece! The foam comes with a pretty strong adhesive, but if I was using it just as an accent on top of a card and not pieced in, I would probably squeeze some Glossy Accents behind to secure it through the mail.

photo 2

Lastly, on the inside, I stamped “happy birthday” along with those perfect gear stamps that I talked about earlier.

I love the way this card came out! The inset foam gives the perfect amount of dimension… more than an embossing powder, folder, or paste, but not so much that it weighs down the card! I will probably be using a lot of this foam in cards to come!

Thanks for reading and have a great day!

To see and purchase the rest of Lawn Fawn’s newest release CLICK HERE!

SUPPLIES: