Hello friends! As I’m sure you all know, Simon Says Stamp is currently hosting STAMPtember all month long on their site. They not only have awesome sales and specials, but they also have exclusive releases.
Lawn Fawn teamed up with Simon to create one of the cutest Christmas sets I’ve ever seen! The set is called Merry Christmouse and filled with fun, cuteness, and lots of cheese. 🙂
Do you love the scalloped borders? Those are one of Lawn Fawn‘s newest stand-alone die sets called Scalloped Rectangles. It is a huge set that comes with TONS of sizes… a definite MUST HAVE.
I’ve been seeing so many crafters making these lately, and I really wanted to try it out and review it for myself. I could not have chosen a better plan seeing how I got the opportunity to use some Xyron products that make these cards 99% easier!
For the front of this card, I wanted to do some “die-cut inlaying.” I took some pictures, so I will take you through it step-by-step in case you have never heard of this technique. I first die cut a 3″ scalloped circle from Lawn Fawn’s Scalloped Circles Stackables for my background from a piece of Hippo Line Dance Paper out of my Let’s Polka 6×6 Petite Paper Pack. I also cut another scalloped circle from typing paper because I will need to have a base to adhere the pieced in die cuts to. I took the sun and largest cloud from the Spring Showers Lawn Cuts set and cut them out of some Neenah Solar White Cardstock.
I wanted my sun to be in front of the cloud, so I die cut the cloud again out of my already cut scalloped circle, placed my white scalloped circle inside, and then cut the sun (see the picture above!). This will allow me to color all my white cloud pieces and my sun, add some Xyron Permanent Adhesive all over my typing paper circle, and then piece them back inside of the circle to create a flat, one-layer look. Like this…
Great technique right? It’s extremely versatile as well, allowing you to get a lot more use out of all your dies!
I used some Simon Says Stamp Inks. I’m absolutely in love with them, but they haven’t added the links to their newest inks yet, so you can find the Lemon Chiffon Ink HERE. The Audrey Blue Ink is a little older and I was able to link it below in the supplies.
Now for the really cool part… when making a clear card, most crafters have to add extra die cuts on both sides of the front and both sides of the inside layer of the card so that adhesive wont be seen through the acetate. NOT ANYMORE! For this card I only needed to use one for the front and one on the inside because the Xyron 3″ Sticker Maker turned my die-cuts into stickers with a thin layer of adhesive that is completely unseen from the other side. You just push you die into the machine…
… and pull it out the other end. Use a bone bolder to firmly press on and all around the die cut to make sure the adhesive goes on evenly.
I did the same technique again for my Scripty Hello sentiment. I also cut another scalloped circle from some Neenah Solar White, stamped a cute little buzzing bee from the Hello Sunshine Stamp Set, and once attached to a Clear Hero Arts Notecard – you’re done. Assembly was a total breeze! You could add a sentiment instead on the inside, but I felt the ‘hello’ on the front of the card was enough.
As you can see… NO ADHESIVE MARKS on the inside from the card-front! Xyron is a total time saver!
Here’s the finished card again…
Overall, here’s some tips for clear cards:
1. You don’t want to see adhesive through the acetate – so if you don’t have a Xyron Sticker Maker, you’ll have to layer the back of the card-front and back of the inside with another die cut.
2. Acetate gets dirty VERY easily and adhesive does not run off very cleanly all the time. Don’t take your acetate out until you’re ready to assemble your card. That way it stays clean, and there is no chance of something from your craft desk falling onto it and making a mess.
3. Be creative! I have a feeling more and more people will be coming around to use these, so don’t be afraid to try something new on this futuristic type of card base.
Let me know if you have any questions, and have a great day!
I’ve been seeing people creating these off centered and slated backgrounds on their cards, and I really wanted to see of I liked this technique because I usually like things on my cards nice and square and centered.
This card was so unbelievable simple to create. I took a few smaller images from Lawn Fawn’s Life is Good Stamp set and created my own patterned paper using Simon Says Stamp’s Khaki Ink and by constantly turning the stamps to create a random pattern. I then took the tiny heart and tiny bird and stamped them randomly with some Hero Arts White Pastel Inks to fill in any empty spaces of the background.
For the slanted panel I used those same yellow and blue white pastel inks and the Tim Holtz Mini Ink Blender to lightly blend those inks onto a piece of Neenah Solar White Cardstock. I then used the yellow ink and put it directly to paper to create the sentiment strip. I also stamped the castle and large bird stamp and stamped, colored, and die cut them.
Lastly, I stamped the “Life is Good” and “!” onto my yellow sentiment strip, made a pennant end with a pair of scissors, and assembled the card popping up the castle and bird with some foam tape!
I hope you enjoyed this card! I think it’s so “beachy” and beautiful! Just another great card using great products!
This is a super quick post that I wanted to share to demonstrate a technique that a lot of people have been talking about: “Emboss-resist.”
This technique allows people to some-what turn their stamps inside-out. The image that would normally be colorful from your ink choice becomes the negative space, allowing the engraved part of your stamp to be inked, painted, or embellished in many different ways.
To accomplish this, I chose a beautiful background stamp, inked it with VersaMark Ink, stamped it, and heat embossed it with some White Hero Arts Embossing Powder. This could have been done with any color of pigment ink and clear embossing powder, but I wanted to use distress inks to add color to this card.
After being embossed, the stamped image will resist ink and only the negative-spaces of the stamp will take the Tim Holtz Distress Inks. I used a rainbow of colors. I then mounted that panel on a sheet of orange foil paper from my DCWV Foil Stack, white heat-embossed my sentiment on the same foil paper, and added some Maya Road Wood Button Embellishments.
Let me know if you have any questions! Thanks for reading!
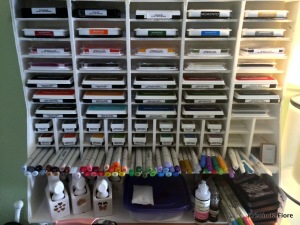
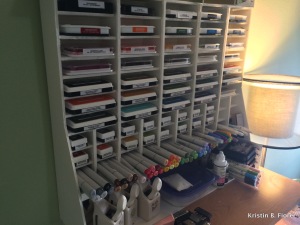
I am so excited to be sharing such a big Technicolored Tuesday project with everyone today! This customized foam board storage unit cost me around $6!!! Granted, it took me an entire day (6-7 hours) to complete, it was well worth it to save the $70-$80 I would have spent on a comparable unit. I definitely think it can be considered technicolored once it’s filled with my supplies!!!
My unit holds 35 large ink pads, 20 small ink cubes, has 10 marker/pen holders, and a large area at the bottom for my punches, embossing supplies, distress supplies, Stickles, and more!
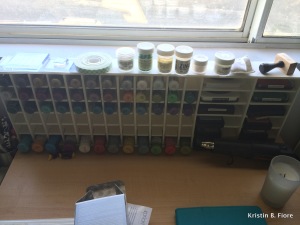
The above photo is a picture of my sisters unit I made for her. It holds 72 Stickles (also fitting perfect pearls, enamels accents, or distress paints), and 12 large ink pads.
If you feel like customizing your own, here are a few tips:
1. The foam board itself is about 1/4 inch thick. That must be accounted for in ALL measurements!
2. Using this “puzzle piece” method with the slots is BY FAR the sturdiest option for these units. I’ve seen people use packing tape and all other forms of adhesive, but they will all warp without having these slots holding them in place. The slots combined with the hot glue give the best hold without a doubt!
3. Large ink pads need AT LEAST 4 in across and 1 in high. I gave extra room for my fingers to be able to slide over top because that is the easiest way for me to get them out. Small ink pads need AT LEAST half that length (2 in), and Stickles need at least 1.25 in.
4. Making the side panels widen at the bottom gives you a sturdier base so it will not fall over!
5. Patience and determination are necessary when getting into a big project like this.
6. It gets easier with practice! I promise!
Here is a video just to get your crafting kicked off:
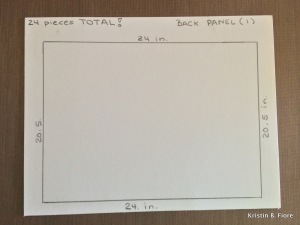
I am a very visual person. I’ve seen numerous foam storage posts, but just seeing the numbers does not help me unless I can see exactly what it should look like. So, here are the dimensions for my exact unit along with the photos:
You will need ONE back panel that measures 24 in x 20.5 in. Before I hot glued my entire project together I used a pencil and drew out the 1/4 inch lines in all the places my shelves would lay. This made it much easier to assemble, and it did not give the hot glue time to harden before I got each panel down. It is essential to work quickly, so the pencil marks definitely helped.
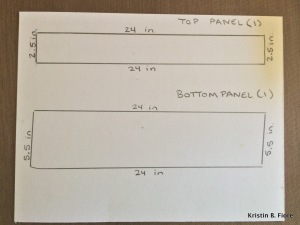
You will need ONE top panel measuring 2.5 in x 24 in, and ONE bottom panel measuring 5.5 in x 24 in. I may have mentioned this before, but if you don’t have your unit get larger towards the bottom, it will most likely get top-heavy and want to tend to fall forward.
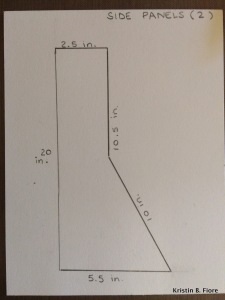
You will need TWO side panels with the measurements above (20 in x 2.5 in x 10.5 in [with a 10 in angle] x 5.5 in).
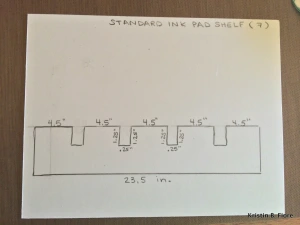
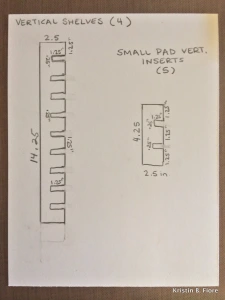
As for the standard ink pad shelves, you will need SEVEN 23.5 in x 2.5 in shelves with 1.25 in x .25 in divots every 4.5 inches.
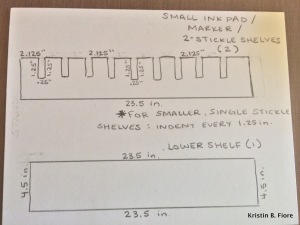
For the small ink pad / COPIC marker shelves, you will need TWO 23.5 in x 2.5 in shelves with 1.25 in x .25 in divots every 2.125 inches. You also need a wider shelf to make sure your markers and pens don’t fall out. The dimensions are in the picture above, but that shelf is really up to your personal preference.
Lastly, to separate the sections you will need FOUR tall vertical shelves measuring 14.25 in x 2.5 in with 1.25 in x .25 in divots every 1.25 inches, and FIVE small vertical shelves only 4.25 in x 2.5 in with 1.25 in x .25 in divots every 1.25 inches.
Please do not hesitate to ask me any questions you may have! It may seem daunting during the process, but once you start assembling you will see the fruits of your efforts!
I’m not even going to try to explain why this post is so late, but I am going to make it all up to everyone because I have a HUGE surprise coming up! I don’t want to ruin the surprise, but it has to do with an extremely affordable craft room storage solution.
I’m excited too, but let’s get to today’s card. I used this awesome washi tape from Michaels. I got it on clearance so I couldn’t find a link online, but really any washi tape will do the trick for this technique. Using different washi tapes gives so many different style options and theme options for how this card could turn out.
The first thing you want to do is layer the washi tape to prepare your own background for die-cutting.
I then used the adorable Lawn Fawn Say Cheese die to cut out the polaroid shape from my panel. I have a Sizzix Big Kick, but any die cutting machine will work.
For this card, I only use the polaroid frame, but you should keep the inside square because it could be used for another card as a background to a sentiment or in a million other ways.
As you can see, it didn’t quite turn out how I wanted it, and you couldn’t really read the sentiment. I decided to use one of my Wink of Stella Pens to color in the sentiment to make it easier to read.
I put a picture of my puppy, Jax, in the colorful polaroid frame. He’s definitely doing the Miley Cyrus pose. Haha.
I attached him and the frame using my Tombow Stamp Runner, but I wanted the hello bubble to really stand out. After cutting it out with my Tim Holtz Scissors, I doubled-up on some 3M Foam adhesive to make it pop.
As my very first post, on my very first blog, I wanted to showcase something that all crafters appreciate: GETTING BANG OUT OF EVERY BUCK!
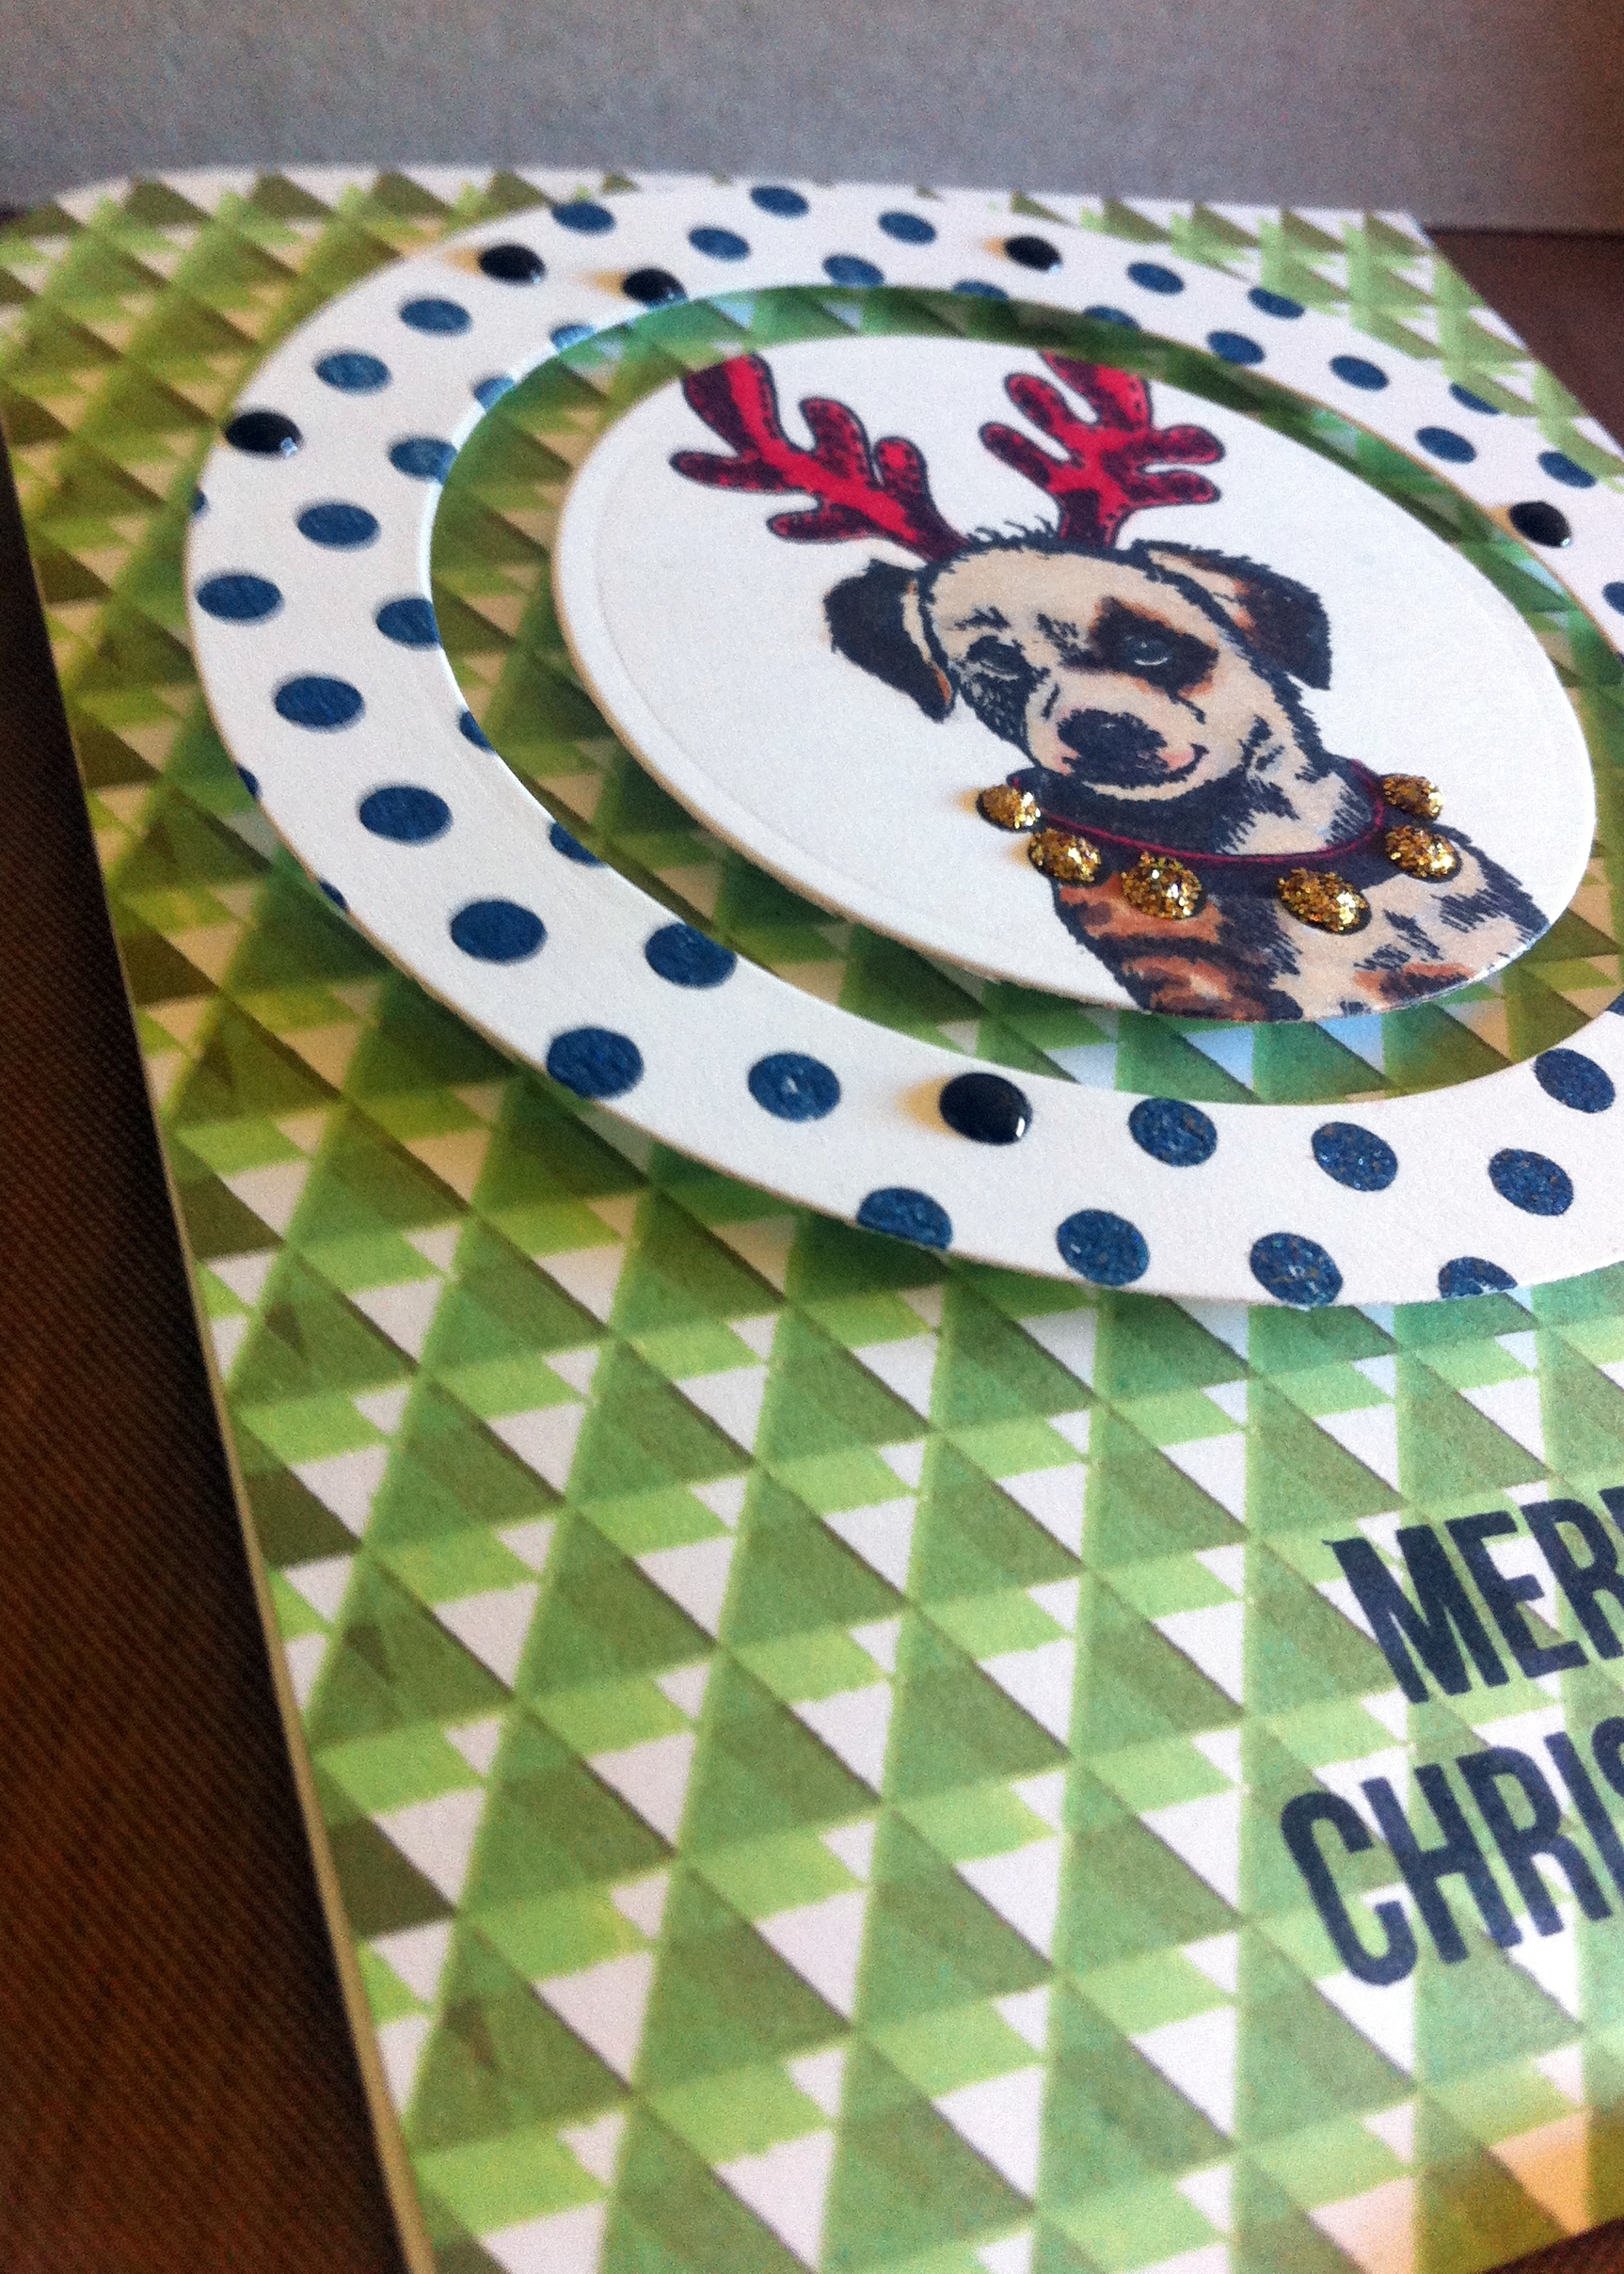
In these cards I showcased the extremely cute Holiday Puppy Wood Stamp by Inkadinkado. You still have to love him even though he broke your ornament!!! It is important to use your stamps in multiple ways with multiple techniques to justify spending upwards of $10 on one single stamp.
This stamp offers so many possibilities for holiday cards. The first card is so easy to replicate too. I stamped the puppy three times in different Hero Arts Shadow Inks – Red Royal, Gold, and Forever Green. I have them in the Hero Arts Christmas Cube Ink Set which is the format I have most of my Hero Arts Shadow Inks. You can re-ink them and I find them easier to handle when I am trying different techniques. It also does not hurt that they are much more cost effective for me in the cube form. I was going to keep this card on the extremely simple and classic side, but while stamping I got a pretty big red ink mark in between the red and gold puppies so I decided to use some tiny cupped sequins to try and cover my mess. Obviously, it does not look perfect, but the sequins definitely helped while adding a little dimension and shine to the card.
The next card is so fun to make because it uses a bunch of different techniques! For this card I stole my inspiration from a blogpost by Jennifer McGuire where she used this same Hero Arts Tiny Flags Background Stamp and “double-stamped” it in two different colors to get a different look to the background. I’m absolutely obsessed with this technique and I know I’ll be using it with a bunch of my other background stamps.
My final card uses products that I use on the daily! For this card I colored the puppy with Distress Markers on Tim Holtz Distress Watercolor Cardstock and cut him out with a little bit of a border. I then inked up my Darice Paw Print Embossing Folder with Barn Door and Mowed Lawn Distress Ink Pads and ran it through my Sizzix BIGkick Machine. I then took some Tea Die Distress Ink and blended it into the puppy and edges of the paw print background to give them both a more “Tim Holtzy” look. I cut my background into strips and then applied them to the card so you can see the white underneath.
I can still think of more and more ways to make use out of this one little puppy, but I really hope you enjoyed the three cards I shared. I also hope you are a little more tempted to use those stamps you buy for more than one or two projects. Never forget: the possibilities are endless!!!