Well done, Dad! Foiled Let’s BBQ Father’s Day Card

My dad sure hit the jackpot creating me! He’s so lucky…

… but so am I to have a dad like him!

Today I have another video tutorial for you! This card was so fun and QUICK to create… I think it only took me 35 minutes!

FullSizeRender (4)

Please enjoy the video and don’t forget to give it a thumbs up or subscribe if you haven’t already!

Here is my close up of that glossy accents. It adds so much detail and dimension to your cards!

FullSizeRender (5)

I really hope you enjoyed this card and I hope everyone has a wonderful Father’s Day!

Jurassic Park Inspired Cards!

Bingo Dino DNA card

Hello, John! Is no one else as excited for a new movie in the Jurassic Park franchise as I am?! Not only are the two cards I made super cute, but I made a video in a completely different format. I’m trying something new, trying to figure out my niche on YouTube and in card making, and I really hope you like it. Please watch, please subscribe, and PLEASE let me know what you think!

This guy would even have looked super fun on a plain colored background! Doesn’t everyone love the most educational part of the movie?!

Jurassic Park Cards

Check out both of my Jurassic Park inspired cards on my Instagram! KristinBFiore

Thank you so much for tuning in!

Look What the Milk Man Brought Today!

Summer 15 Inspiration Week

Welcome to the next day of Inspiration Week over on the Lawn Fawn Blog! Today we are showcasing two of our new stand-alone dies that will change your die-cutting life!!

The Milk Carton Die is perfect for party favors, treats, or even as storage for beads and sequins! It is also amazingly easy to put together, just like our Goodie Bag Die!

Have a Ball Milk Carton

Here I used another new set from the release to make a cute treat box full of gumballs! How cute is the sneak of this stamp set?! A lot of people requested a set like this so I cannot wait to show you the whole thing!

Milk Carton Die

I do have a card using the Stitched Border Dies that are also being showcased today, but I am saving it for Monday’s post when the stamp set is revealed 😉

I hope you enjoyed this little treat box and I hope everyone checks out the Lawn Fawn Shop on the 4th to get their hands on it. I promise you will get SO MUCH use out of it!

Are You a Party Animal?

Summer 15 Inspiration Week

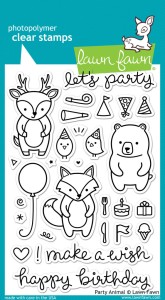
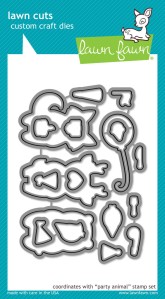
Today on the Lawn Fawn Blog, we are revealing the brand new Party Animals Stamp and Die sets that will be released next week!

This set is so fun and cute! It is not only great for birthday cards, but the critters go along with so many other Lawn Fawn sets!

Party Animal Card

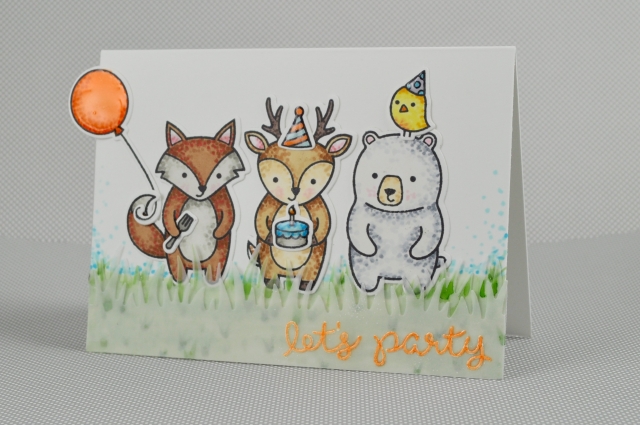
For this first card, I wanted to really showcase the set! There are so many images in this set, I would challenge anyone to use all the images on one card!

I used a coloring technique I learned from Jennifer McGuire that adds so much texture to any image. I got a little obsessed and dotted all the COPIC coloring on this card. Even the grass got some dottin’!

Congrats Party Animal Card

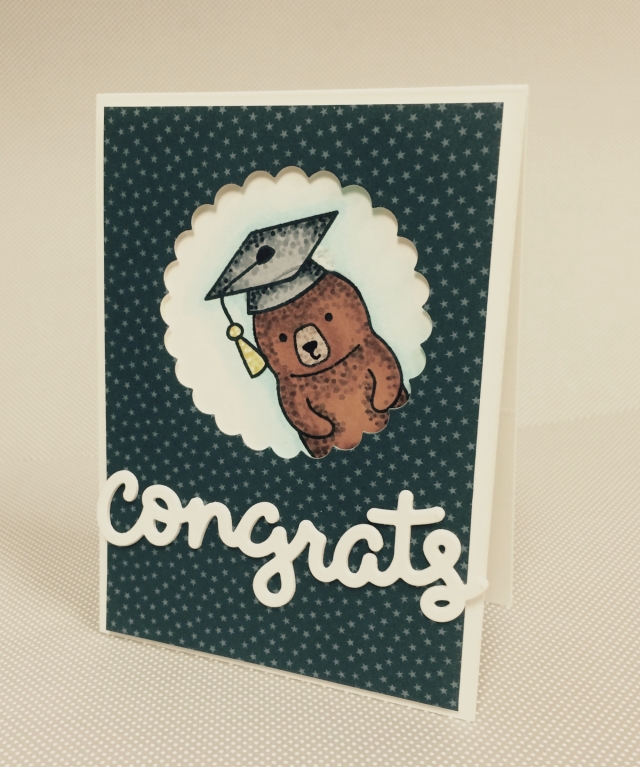
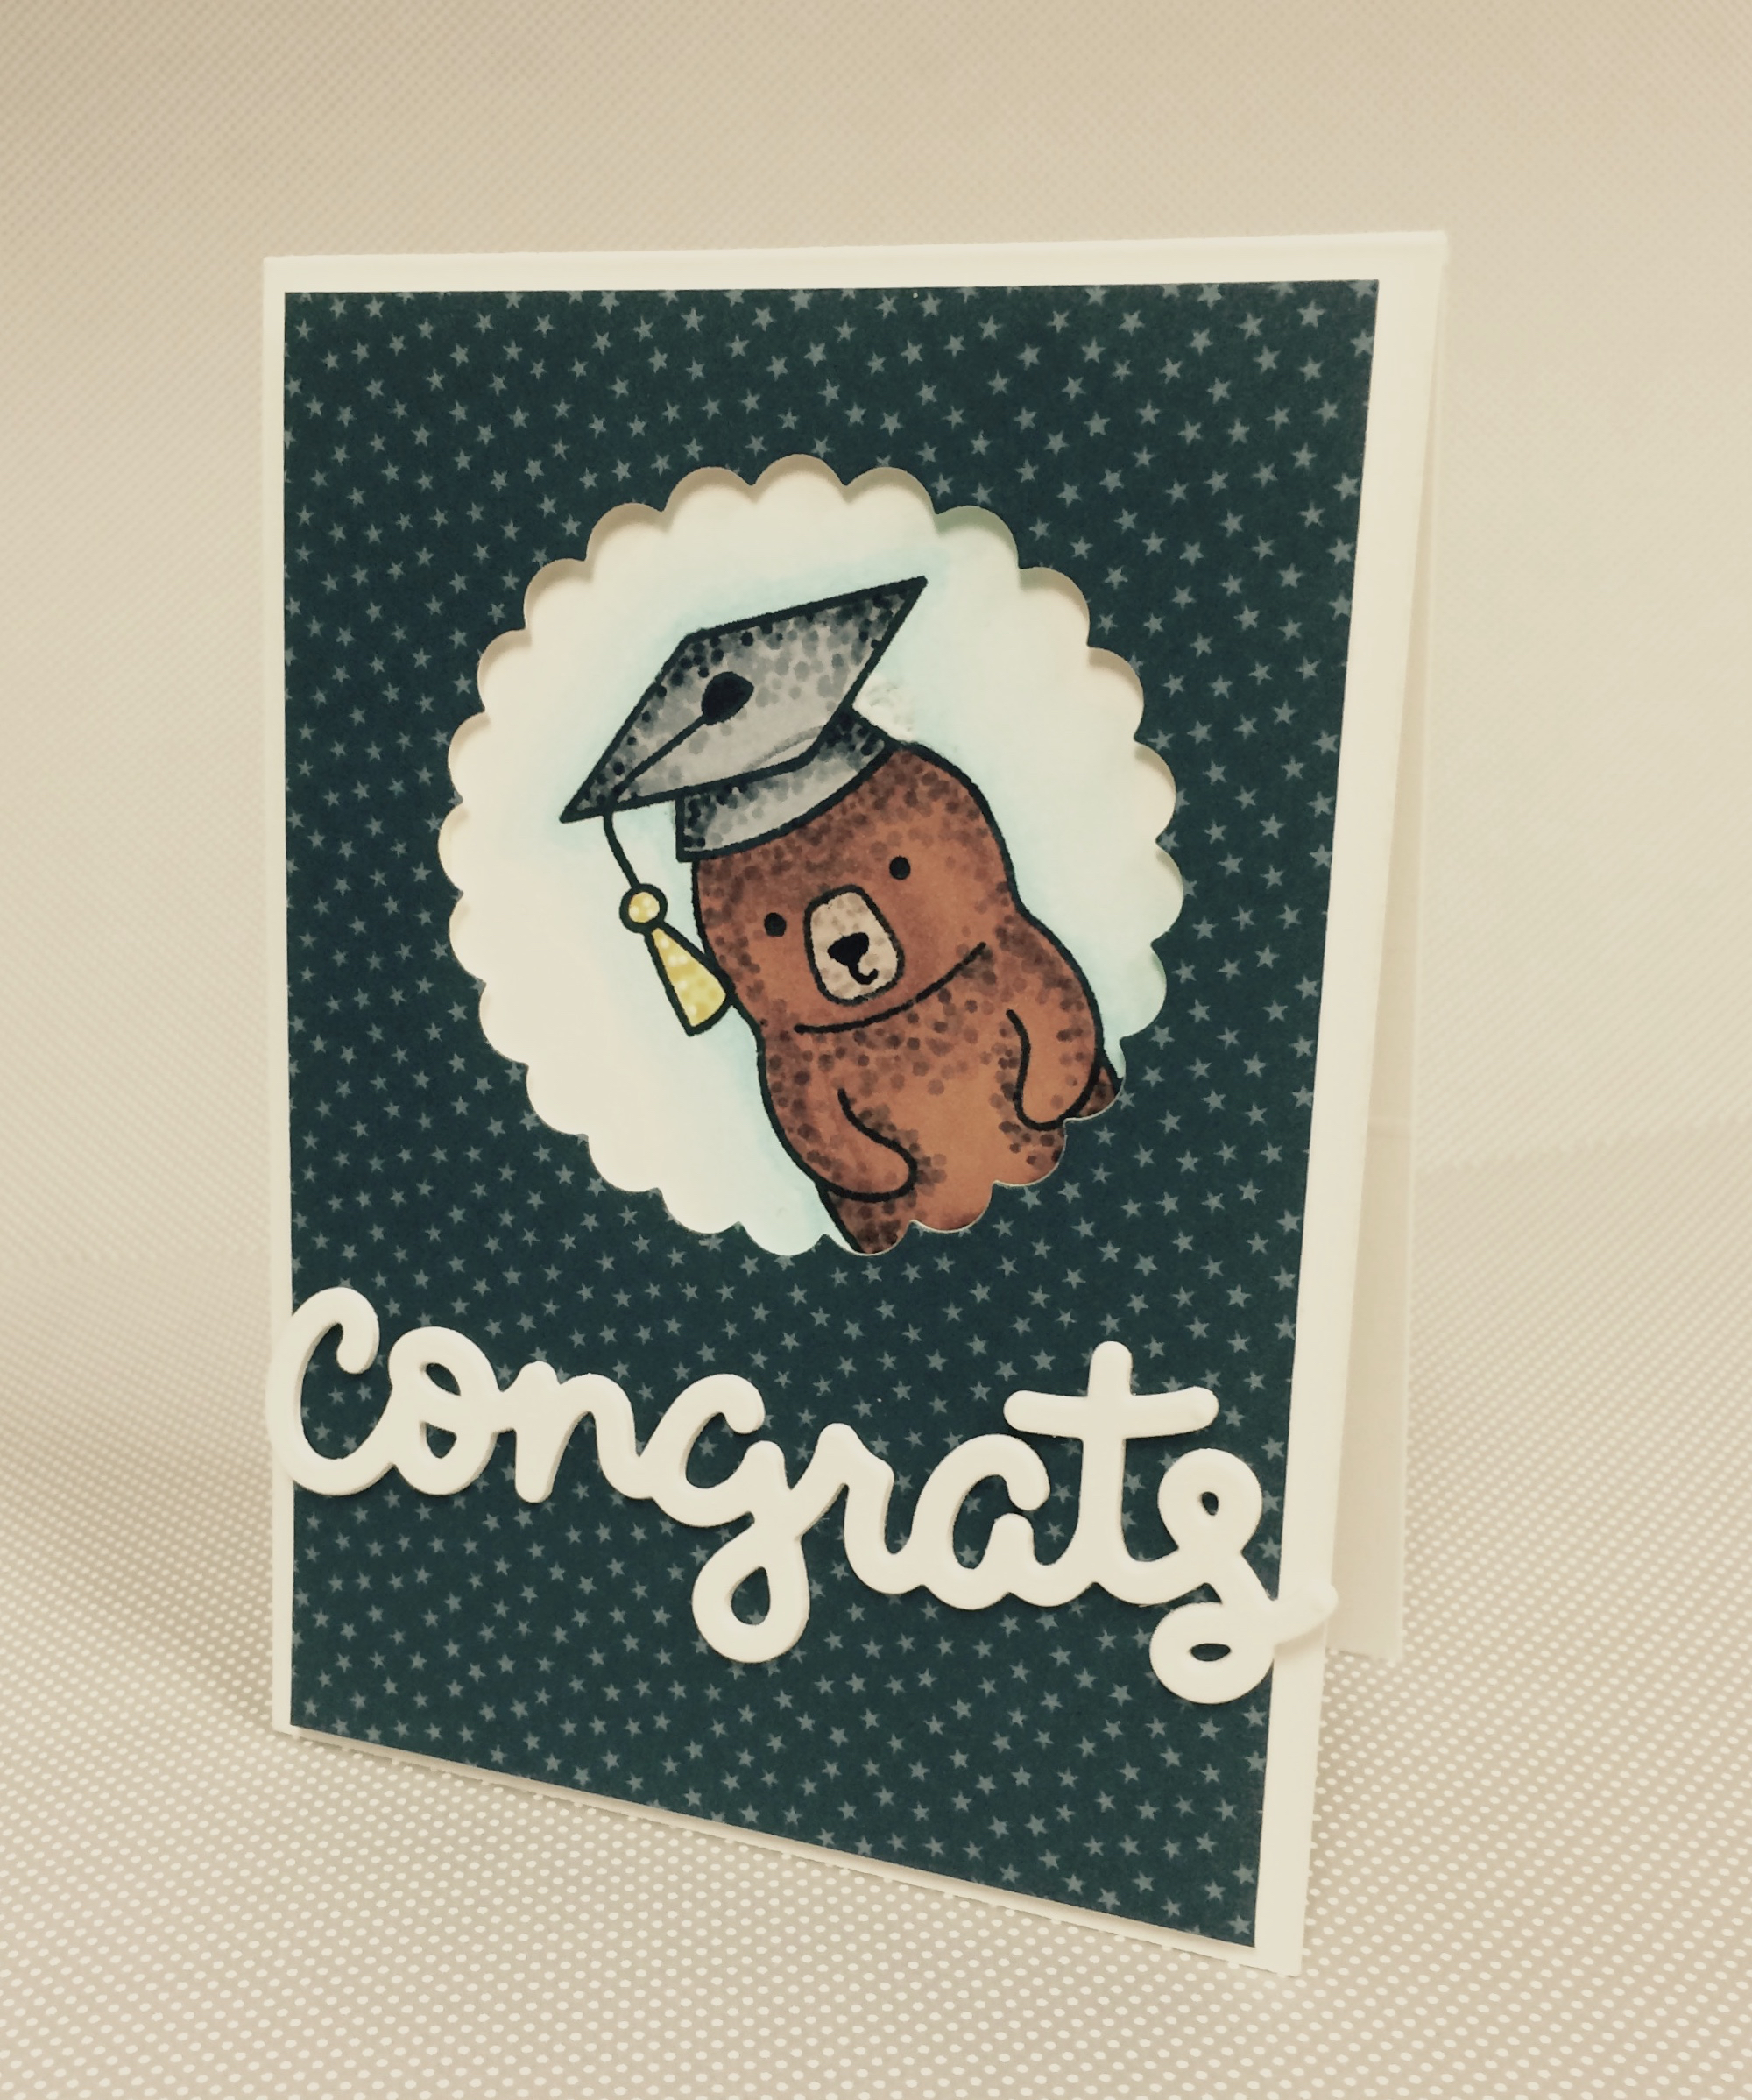
Okay, so I just could not stop with the dot coloring! I made this card for a young friend graduating from 8th grade soon! I love how the critters from the Party Animals Stamp Set go so perfectly with any of the hats from the Hats Off to You Set.

This card also gives you a look at one of our new stand-alone word dies! The Lawn Fawn handwritten sentiments in the stamps and dies are so great because they can be playful and girly while working on masculine cards just as well!

Party AnimalParty Animal Dies

I want to point out that our card camera has been having some issues, so I’m sorry ahead of time if the picture quality of my cards is not 100% this week!

I hope you love this new set, and I cannot wait to see what you create with it when you get your hands on it next week!

Thank you so much for checking in with me, and make sure you check out the Lawn Fawn Blog for fun inspiration and giveaways all week!

Monochromatic Egg Patch Easter Card

Happy Easter!

IMG_3494

I hope everyone enjoys this special day filled with family and fun! 

Click the picture below to watch the video!

Thank you so much for tuning in!

Supplies:

Have an Otterly Great 5th Birthday, Lawn Fawn!

Hi everyone!

happy-5th-bday-lf

I am so excited to be part of this special blog hop celebrating Lawn Fawn’s 5th birthday!

IMG_3449

I made a similar card when I first got my hands on this Year 5 Stamp Set and it has been used a lot in advertising this release, so I thought this would be the perfect time to show how that card was made.


Thank you so much for tuning in! Have a great day and enjoy the hop!!

Next stop is Samantha!

Here is the complete blog list in case you want to start at the beginning!
Jenn Rachel Audrey Samantha Lenny Veronica Nancy Lorraine Caryn Sharna Suzanne Roxanne Lynn Laura Cheiron Ivy Karin Tamara Jana Lexa Debby me <– YOU ARE HERE
Samantha Yukari Christy Elise Amy Kathy

Supplies:

Happy Easter Card using Lawn Fawn inks and Eggstra Special Easter Set

I’m back!

I also have exciting news. I’m really trying to educate myself on creating quality tutorial videos!

Check out my first one here:

If you liked it, subscribe to my channel!

Thank you so much for checking in!

Supplies:

One Layer ‘Friends Forever’ Custom Dreamcatcher Card

Learning how to use my markers more efficiently, I’ve gotten really into creating my own images. I’m not the best drawer so I try to use the products I have to make more precise pictures.  Today, I used Lawn Fawn’s Circle Stackables Lawn Cuts to draw a beautiful dreamcatcher.

IMG_2445

I started by drawing the outline circle of the dreamcatcher with the inside of my larger circle die. I then took a pencil and drew 8 evenly spaced dots around my circle (top, bottom, left, right, and the 4 points between), and a dot right in the center. I used a pencil so I could easily erase these dots later on. I then used the smaller circle die, placed it between two dots, and traced this petal shape using my 0.3 COPIC multiliner. Altogether, it takes 18 of these curved lines to create the center of my dreamcatcher.

It may seem daunting and tedious at first, but it was actually SUPER simple, only took about 5 minutes to create, AND now I can make almost any size dreamcatcher I want using the same steps.

FullSizeRender

IMG_2447

I then used the Simon Says Stamp and Lawn Fawn Collaboration Set ‘Feathered Friends’ to stamp some feathers to hang from three points on my dreamcatcher.

IMG_2448

I used my COPIC multiliner again to draw in the strings connecting the feathers.

IMG_2449

Before I colored the feathers, I wanted to make sure I had a good color palette. Even though it is unconventional to add sequins before you color, I went ahead and did it anyway to give myself a better idea of the COPICs I needed to use. I added these flat sequins by Kelly Purkey from her Metallic Mix. I love how these flat sequins end up looking like beads on the strings of my dreamcatcher!

FullSizeRender

Now I was ready to color! I used a technique that I learned in the COPIC Markers for Card Makers Class that I have been using ALL the time. I put a layer of Colorless Blender over my image, add whatever colors I want to the areas I want to have shade or be darker, then I bring the Colorless Blender back in to soften all the edges. I have never loved coloring so much with my COPICs! You can get some really light, pastel, and watery-looking images coloring this way.

IMG_2452

Because I really wanted my custom image to be the focus, I kept this card one-layer and extremely clean. I only added a touch of my Wink of Stella Glitter Brush to the feathers, stamped the ‘friends forever’ sentiment, and I was done!

IMG_2454

I have the perfect friend to send this card to, and even though this card is lovely – it’s not nearly as gorgeous as she is!

FullSizeRenderThanks for stopping by!

SUPPLIES:


COPIC Markers for Card Makers: Card inspired by Debby Hughes

IMG_2348

If you have been following my Instagram, you are aware that I am completely obsessed with the COPIC Markers for Card Makers class from Online Card Classes. Today was the first day I really got to spend some time making a whole card, and I’m so excited to have tried something completely new, but right up my alley at the same time.

Debby Hughes was a guest today, and I was so inspired by her watercolor/mixed-media-like styled cards.

IMG_2347

For my card, I used one of the classes practice images that is actually from Lawn Fawn‘s Critters in the Burbs Stamp Set. I colored it using the technique Debby showed (I highly recommending signing up for the class – if you haven’t already – to access this technique video as well as MANY others), then I cut it out using some precision scissors, and fixed my edges with a black felt tip marker.

I used a piece of Neenah Solar White 110# Cardstock, the Tim Holtz THS024 Chevron Layering Stencil, and some Wendy Vecchi White Embossing Paste to make an imperfect strip of texture coming from the top left of my card. After allowing it to dry completely, I cut a 1” Strip of Studio Calico {Hex} Vellum, ripped the long end to my desired size, and adhered it with a little but of Studio Multi Medium Matte. I NEEDED to use this sentiment from the Feathered Friends STAMPtember collaboration of Lawn Fawn And Simon Says Stamp! It says “friends forever,” but with ‘selective-inking’ I made it say “friends furever.” I grabbed a strand of light green thread and crumbled it up – I added some foam squares to the back of my puppy image and adhered it down over the thread to hold it in place. Lastly, I embellished my card with some Lawn Fawn sequins from some past collections.

IMG_2349

I really LOVE how this card turned out, and I would encourage everyone to try something new whenever they need some inspiration!

SUPPLIES:

Happy Birthday, Butterfly!

IMG_2314

Hi, there! I quickly wanted to share this card using the gorgeous Butterfly Die I received from Top Dog Dies. This large and intricate butterfly die also comes with another die as well! I ran this larger butterfly through my machine (it cut like BUTTER), then I quickly colored it with a rainbow of COPIC markers.

I used the largest rectangle from Lawn Fawn’s Large Stitched Rectangle Lawn Cuts to create my card base. I let the creased end of my card hang off of my cutting mat so that it got the stitched edge but it wasn’t cut completely off by the die. I then used the second largest rectangle from that same set, as well as the largest rectangle from the Small Stitched Rectangle Lawn Cuts to create the perfect mats from some Hello Sunshine papers.

As for that white stitched diagonal shape – I tried something a little funky. I wanted to see if I could get even more out of these dies… AND BOY COULD I!! I used the largest rectangle from the Large Stitched Rectangle Lawn Cuts again, but this time I cut it once, then cut it a second time to make a long, thin stitched rectangle, then I ran it through one more time, but tilted it to my desired angle and created this awesome strip… Here are some pictures that will hopefully help you understand what I did.

Start with this…

IMG_2315…Run it through your machine. Then run it through again like this…

IMG_2318You’ll get a piece that looks like this…

IMG_2319This is awesome if you want any size rectangle for your cards. You can make them as wide or skinny as you want. To get an angled piece, just run it one more time like this…

IMG_2320… and you’ll get this…

IMG_2321


I used Violet’s ABC’s Stamp Set to create the “Happy Birthday” sentiment. I adhered the butterfly with some glossy accents just on the body so I could pop out the wings.

Here is the final card again…

IMG_2314

I hope you enjoyed!

For supplies, please click the links throughout the post. I’ve been having trouble with InLinkz and will put in a proper supply list once  I can.